|
 This function can be call using the [F12] key. This function can be call using the [F12] key.
Opens a form in order to initiate analysis of the Radio link from a point to a point.
The points in this analysis are objects and retrieved from a network. Also it is possible to analyse from the transmitter to any point on the radio link. This point has to be clicked on by the mouse.
Window types
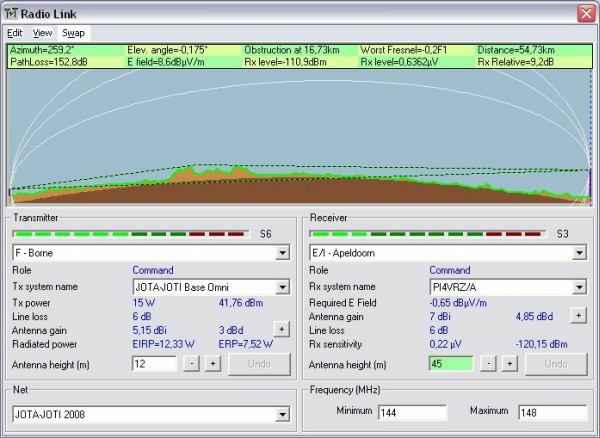
The radio link tool enables to evaluate a radio link. All relevant information is displayed in this tool.
The radio link tool displays in formation in 4 ways:
- Profile
- Details
- Range
- Distribution
On the bottom of the window the Transmitter, Receiver, Net and frequency are displayed.
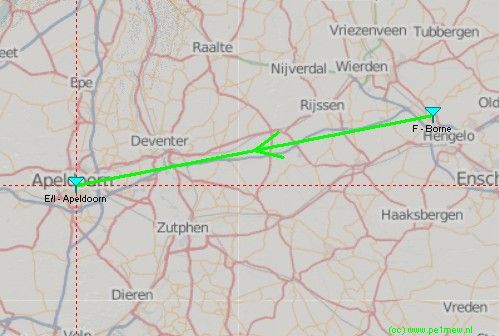
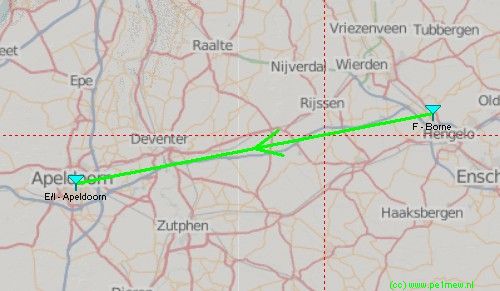
Relation of the radio link to the current map window
The radio link is directly coupled to the current map window and displays on the map the analysed radio link.
| Radio link window |
Current map window |
|
TX and RX
|
The cursor is set at the RX unit and the complete radio link is analysed.
|
|
TX to Cursor
|
The cursor is set at the RX unit and the complete radio link is analysed.
|
Swap function
The swap function swaps the TX and RX unit.
| Radio link window |
Current map window |
|
TX and RX
|
The cursor is set at the RX unit and the complete radio link is analysed.
|
|

TX and RX Reversed (RX to TX)
|

The cursor is set at the RX unit and the complete radio link is analysed.
|
Frequency
Initial the frequency is copied from the 'Network properties - Parameters' but can be changed to the meet the requirements for the analysis.
Net
This is the net in which both Transmitter and receiver are member. When Transmitter and receiverare member of more Nets those nets can be selected.
All values in the Transmitter and Receiver plane are related to the link budget. See 'how to > Link budgets'
Transmitter
This information applies to the Transmitter in the evaluated link.
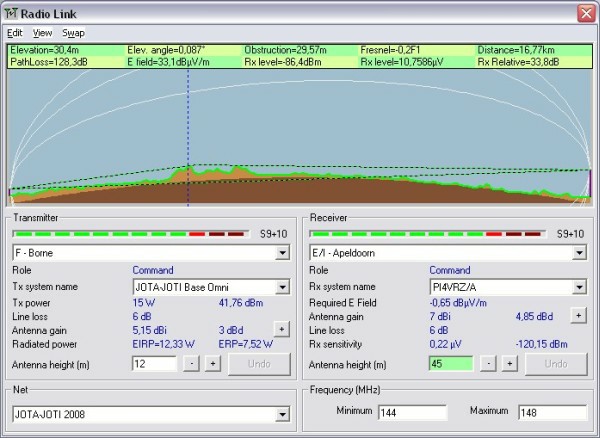
Signal meter bar
This 'S-meter' displays the RSSI of the receivers station at the Transmitter location. The Setting of the S-meter can be configured at 'Options - S-Unit'
Unit
Through a pull-down menu the required Transmitting unit can be selected.
Role
The role that the Transmitting unit has. This is set in 'Network properties - Membership > Role of unit'
TX system name
The System name that is applied to the unit. The system is applied to the unit in in 'Network propererties - Membership' and the system is configured in 'Network properties - Systems'
TX Power
TX power of the transmitting unit as applied to the unit by the selected system. The power is expressed in Watts and dB.
Line Loss
Line loss in dB between the transmitter and the antenna of the transmitting unit as applied to the unit by the selected system.
Antenna gain
Using the [+] button the applied antenna pattern can be viewed. The purple line in the antenna pattern viewer displays the direction of the radio link with respect to the unit.
Radiated Power
The Radiated power in Eirp and Erp in Watt
Antenna Height (m)
Using the [-] and [+] button the antenna height can be altered in 0.1 meter steps. Also it is possible to enter the antenna height directly.
Undo
When the antenna height is changed in the Radio Link window the [undo] button enables. Using the undo button the antenna height is reset to the value as specified in 'Network properties - Systems'
Receiver
This information applies to the Transmitter in the evaluated link.
Signal meter bar
This 'S-meter' displays the RSSI of the receivers station at the Transmitter location. The Setting of the S-meter can be configured at 'Options - S-Unit'
Unit
Through a pull-down menu the required Transmitting unit can be selected.
Role
The role that the Transmitting unit has. This is set in 'Network properties - Membership > Role of unit'
RX system name
The System name that is applied to the unit. The system is applied to the unit in in 'Network propererties - Membership' and the system is configured in 'Network properties - Systems'
Required E-Field
The by the receiver required E-field in dB(uV/m). This is the real fieldstrength required at the antenna and is calculated from RX sensitivity, line loss, and antenna gain.
Antenna gain
Using the [+] button the applied antenna pattern can be viewed. The purple line in the antenna pattern viewer displays the direction of the radio link with respectto the unit.
RX Sensitivity
RX Sensitivity of the receiver in uV and dBm at 50 ohms.
Antenna Height (m)
Using the [-] and [+] button the antenna height can be altered in 0.1 meter steps. Also it is possible to enter the antenna height directly.
Key Strokes
Summary of keyboard Short cuts in Radio Link Pane
| Do: |
Comment |
| Any click in the profile area |
Moves cursor to that point on the radio path |
| Any click in the Green data area |
Moves cursor to the Worst Fresnel obstruction |
| Shift-Left click in the profile area |
Moves cursor to the start of radio link |
| Shift-Right click in the profile area |
Moves cursor to the end of radio link |
| |
|
| Up arrow in the profile area |
Moves cursor to the Worst Fresnel obstruction |
| Left arrow in the profile area |
Moves cursor towards the start of link |
| Right arrow in the profile area |
Moves cursor towards the end of the link |
| Shift-Left arrow in the profile area |
Moves cursor to the start of radio link |
| Shift-Right arrow in the profile area |
Moves cursor to the end of radio link |
| |
|
| Ctrl ] |
Selects Receive antenna box |
| Ctrl [ |
Selects Transmit antenna box |
| |
|
| Page Up |
Increases selected antenna height in 1m increments |
| Page Down |
Decreases selected antenna height in 1m increments |
| Shift+Page Up |
Increases selected antenna height in 0.1m increments |
| Shift+Page Down |
Decreases selected antenna height in 0.1m increments |
| Ctrl+Page Up |
Increases selected antenna height in 10m increments |
| Ctrl+Page Down |
Decreases selected antenna height in 10m increments |
| |
|
| Height + button |
click Increases antenna height in 0.5m increments * |
| Height - button |
click Decreases antenna height in 0.5m increments * |
| Click on Undo button |
Returns selected antenna height to start value * |
| Click in the height box |
Allows manual insertion of height * |
| Enter |
Repeats an action on a selected button * |
| |
* These actions require the use of: |
| Ctrl+P |
Transfers program focus back to the Profile Area |
| |
|
| Ctrl + |
Toggles Up the picture panes in main window |
| Ctrl - |
Toggles Down the picture panes in main window |
| Ctrl-1, Ctrl-2, etc. |
Toggles to picture pane in main window |
| |
|
| CTRL-F1 |
Observe 5 degrees |
| CTRL-F2 |
Observe 10 degrees |
| CTRL-F3 |
Observe 20 degrees |
| CTRL-F4 |
Observe 40 degrees |
| CTRL-F5 |
Observe 80 degrees |
| CTRL-F6 |
Observe in a new large window |
|
